大家好,我是宝哥!前言
现在微信小程序越来越火了,相信不少人都通过各种途径学习过微信小程序或者尝试开发,作者就是曾经由于兴趣了解开发过微信小程序,最终自己的毕业设计也是开发一个微信小程序。所以现在用这篇博客记录我之前开发的一些经验和一些心得吧。
主要内容微信小程序项目构建
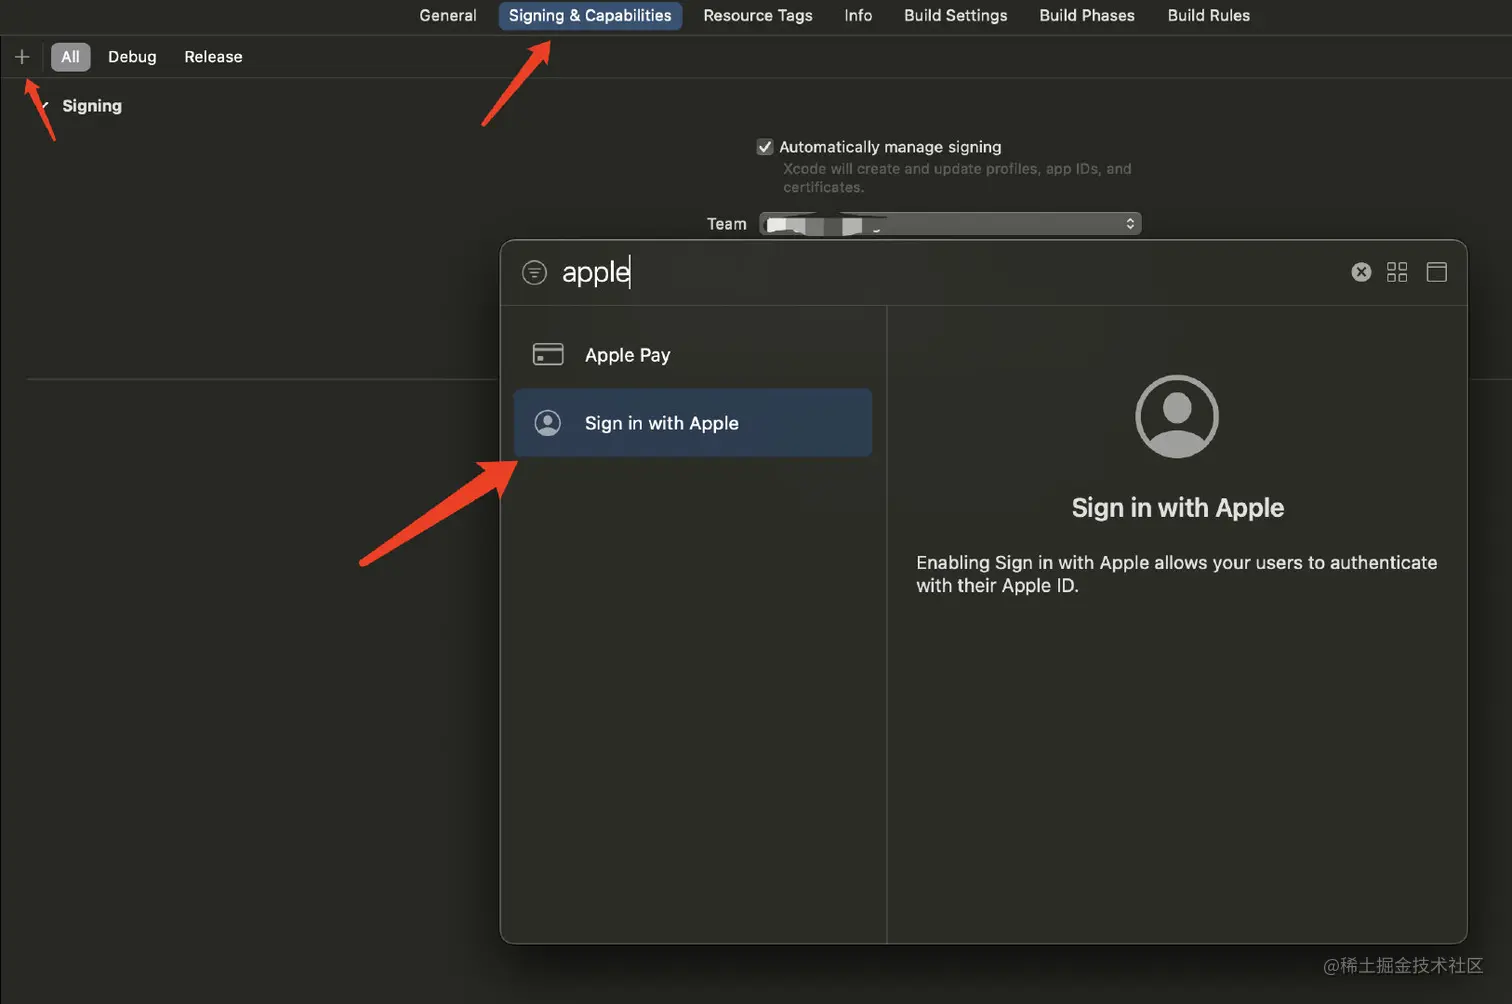
这些基础的东西我就不过多介绍,大家在刚开始开发的时候一般都没有自己的服务器及域名,所以大家在本地编写的时候,在“详细”下的“项目设置”里面将“不校验域名安全性”勾选。
![图片[1]-放假了,在家写一个微信小程序(前端+Java后端)-JieYingAI捷鹰AI](https://www.jieyingai.com/wp-content/uploads/2024/12/1733422237883_0.png)
图片
至于微信小程序的组件,即前端页面的开发希望大家耐住寂寞认真在微信开发平台上研究。
后端详解
我在后端编写主要是用java,当然对其他开发语言熟悉的也可以使用其他语言开发后端。现在我就java编写后端api的讲解。主要框架springboot,开发工具myeclipse,服务器阿里云服务器。
创建一个maven项目,导入相关依赖:
pom.xml依赖
<parent>
 <groupId>org.springframework.boot</groupId>
 <artifactId>spring-boot-starter-parent</artifactId>
 <version>1.5.9.RELEASE</version>
</parent>
<dependencies>


 <dependency>
  <groupId>org.springframework.boot</groupId>
  <artifactId>spring-boot-starter-freemarker</artifactId>
 </dependency>


 <dependency>
  <groupId>org.springframework.boot</groupId>
  <artifactId>spring-boot-starter-web</artifactId>
 </dependency>


 <dependency>
  <groupId>org.springframework.boot</groupId>
  <artifactId>spring-boot-starter-web</artifactId>
  <exclusions>
   <exclusion>
    <groupId>org.springframework.boot</groupId>
    <artifactId>spring-boot-starter-tomcat</artifactId>
   </exclusion>
  </exclusions>
 </dependency>

 <dependency>
  <groupId>org.apache.tomcat.embed</groupId>
  <artifactId>tomcat-embed-jasper</artifactId>
 </dependency>
</dependencies>
在配置文件src/main/resources/下创建application.properties文件可以修改一些配置参数等。
#jsp支持
spring.mvc.view.suffix=.jsp
spring.mvc.view.prefix=/WEB-INF/jsp/
#this is set port
#server.port=80
server.port=443
#添加ssl证书
#ssl证书文件名
server.ssl.key-store=classpath:xxxxxxx.pfx
server.ssl.key-store-password=xxxxxxxx
server.ssl.keyStoreType=xxxxxxxx
在实际项目中可能涉及数据库,还要整合mybatis,在文章中,我仅仅做测试就不做使用数据库的测试。
首先创建springboot的入口程序:app.class下面贴上代码:
@ComponentScan(basePackages= "com.bin")//添加扫包@ComponentScan(basePackages= "")
@EnableAutoConfiguration
public class App{

 //启动springboot
 public static void main(String[] args) {
  SpringApplication.run(App.class, args);
 }
}
启动项目时直接右击run即可。
在写一个测试的controller进行微信小程序与java后端实现通信,controller代码如下:
@RestController
@SpringBootApplication
public class ControllerText {

 @RequestMapping("getUser")
 public Map getUser(){
  System.out.println("微信小程序正在调用。。。");
  Map map = new HashMap();
  List list = new ArrayList();
   list.add("zhangsan");
   list.add("lisi");
   list.add("wanger");
   list.add("mazi");
   map.put("list",list);
  System.out.println("微信小程序调用完成。。。");
  return map;
 }

 @RequestMapping("getWord")
 public Map getText(String word){
  Map map = new HashMap();
  String message = "我能力有限,不要为难我";
  if ("后来".equals(word)) {
   message="正在热映的后来的我们是刘若英的处女作。";
  }else if("微信小程序".equals(word)){
   message= "想获取更多微信小程序相关知识,请更多的阅读微信官方文档,还有其他更多微信开发相关的内容,学无止境。";
  }else if("西安工业大学".equals(word)){
   message="西安工业大学(Xi'an Technological University)简称”西安工大“,位于世界历史名城古都西安,是中国西北地区唯一一所以兵工为特色,以工为主,理、文、经、管、法协调发展的教学研究型大学。原中华人民共和国兵器工业部直属的七所本科院校之一(“兵工七子”),陕西省重点建设的高水平教学研究型大学、陕西省人民政府与中国兵器工业集团、国防科技工业局共建高校、教育部“卓越工程师教育培养计划”试点高校、陕西省大学生创新能力培养综合改革试点学校。国家二级保密资格单位,是一所以"军民结合,寓军于民"的国防科研高校。";
  }
  map.put("message", message);
  return map;
 }

 @RequestMapping("")
 public String getText(){
  return "hello world";
 }


}
至此简易的后端框架及测试基本完成。
说明:@RestController与@Controller注解的区别@RestController相当于两个注解,它能实现将后端得到的数据在前端页面(网页)中以json串的形式传递。而微信小程序与后台之间的数据传递就是以json报文的形式传递。所以这就是选择springboot框架开发小程序后端的主要原因之一。可以方面我们进行小程序的后端开发。
小程序发起网络请求
在完成了小程序的后端开发,下面进行小程序端发起网络请求。
下面以一个简单的按钮请求数据为例:
wxml文件
<button bindtap='houduanButton1'>点击发起请求
<view wx:for="{{list}}">
    姓名:{{item}}
js文件
 /**
   * 页面的初始数据
   */
  data: {
    list: '',
    word: '',
    message:''

  },
  houduanButton1: function () {
    var that = this;
    wx.request({
      url: 'http://localhost:443/getUser',
      method: 'GET',
      header: {
        'content-type': 'application/json' // 默认值
      },
      success: function (res) {
        console.log(res.data)//打印到控制台
        var list = res.data.list;
        if (list == null) {
          var toastText = '数据获取失败';
          wx.showToast({
            title: toastText,
            icon: '',
            duration: 2000
          });
        } else {
          that.setData({
            list: list
          })
        }
      }
    })
  }
主要调用的api就是wx.request,想知道将详细的介绍大家可以去微信公众平台。
接下来以搜索类型的请求为例:
wxml文件:
 <input type="text" class="houduanTab_input" placeholder="请输入你要查询的内容" bindinput='houduanTab_input'>
  <button bindtap='houduanButton2'>查询
  <view wx:if="{{message!=''}}">
    {{message}}
js文件:变量的定义见上一个js文件
//获取输入框的内容
  houduanTab_input: function (e) {
    this.setData({
      word: e.detail.value
    })
  },
  // houduanButton2的网络请求
  houduanButton2: function () {
    var that = this;
    wx.request({
      url: 'http://localhost:443/getWord',
      data:{
        word: that.data.word
      },
      method: 'GET',
      header: {
        'content-type': 'application/json' // 默认值
      },
      success: function (res) {
        console.log(res.data)//打印到控制台
        var message = res.data.message;
        if (message == null) {
          var toastText = '数据获取失败';
          wx.showToast({
            title: toastText,
            icon: '',
            duration: 2000
          });
        } else {
          that.setData({
            message: message
          })
        }
      }
    })
  }
至此已经完成了简易的微信小程序端与java后端进行通信。
现在可以在启动后端项目在微信开发工具上进行测试。
演示效果:
![图片[2]-放假了,在家写一个微信小程序(前端+Java后端)-JieYingAI捷鹰AI](https://www.jieyingai.com/wp-content/uploads/2024/12/1733422237883_1.gif)
![图片[3]-放假了,在家写一个微信小程序(前端+Java后端)-JieYingAI捷鹰AI](https://www.jieyingai.com/wp-content/uploads/2024/12/1733422237883_2.gif)
所以至此已经完成了小程序的前后端通信。